Add multiple items at once
On this page, you will find a step-by-step guide on how to add multiple items to your product range at once. If you want to add a large number of items to your account in one go, this can be automated using our API. For more information, please refer to the 'Frequently Asked Questions' section at the bottom of this page.
Add multiple items at once
In your seller account, you can add or modify product information for multiple items at once. You can do this using the following steps:
Go to your seller account
Under ‘Items’, choose ‘Add items in bulk’.

Add items in bulk
In your seller account, click on ‘Items’ at the top, then choose ‘Add items in bulk’. You have 2 options to upload your items in bulk:
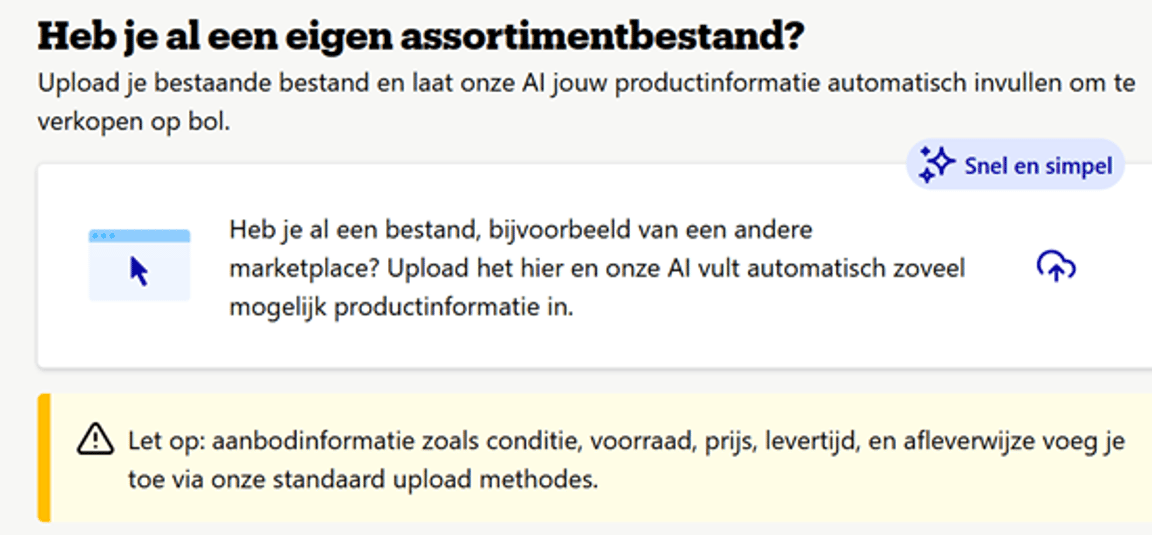
Option 1: Automatically link and enrich product information
With this upload method, your existing product information will be automatically linked to bol’s model. This upload method does not process offer information which you can easily add afterwards. You will receive a template for this at the end of the upload process.
Option 2: Manually add product information and offers via Excel
Upload your files
Make sure all your information is on the first tab, as only that tab will be read. Additionally, we ask you to place the column names in the first row of the Excel field. It is important that column names are not duplicated. For example, if ‘Stock’ is now in column E, this column should not appear again in another row.

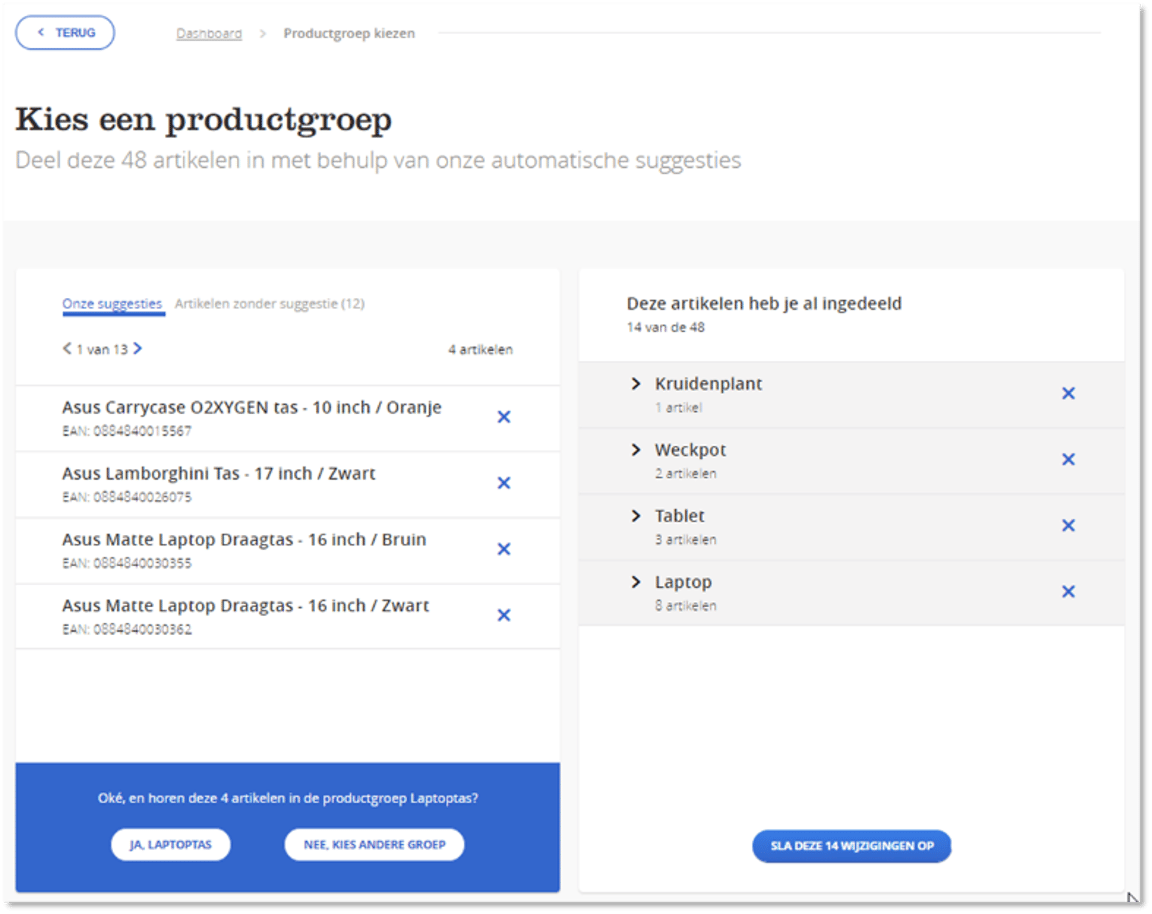
Assigning the product category
Do you want to add items that are not yet sold via bol? Then we ask you to link the columns containing your EAN, title, and descriptions to those of bol. As soon as you have added this information to the system, it will try to suggest a product category.
How does item categorization work?
We aim to help you categorize as effectively as possible. Here's how it works:
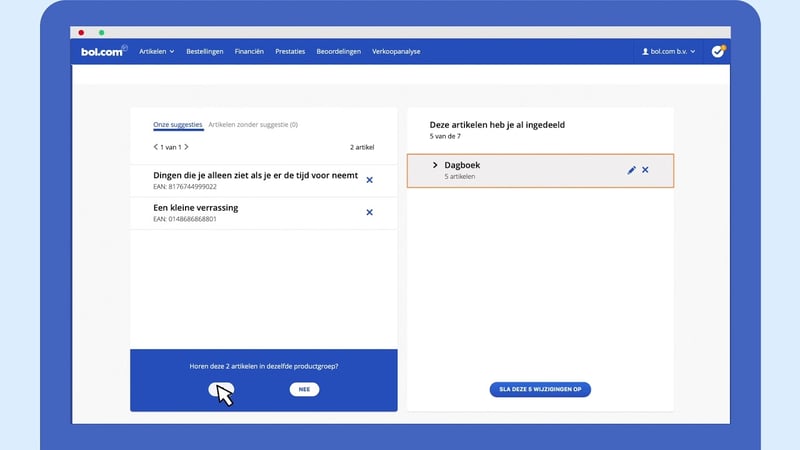
- Items that are identical – or very similar – are grouped into ‘sets’. This allows you to categorize these sets in one go.
- Wherever possible, the product category is predicted. You then only need to confirm it.
- If the prediction is incorrect, you can search for a product category yourself.
- Have you linked an item to a product category? Then you can click ‘continue’. You can then proceed to link the other items to the correct product category. Items already known to bol do not need to be assigned to a product category again.
- Have you assigned all items to the correct product category? Then save the changes.
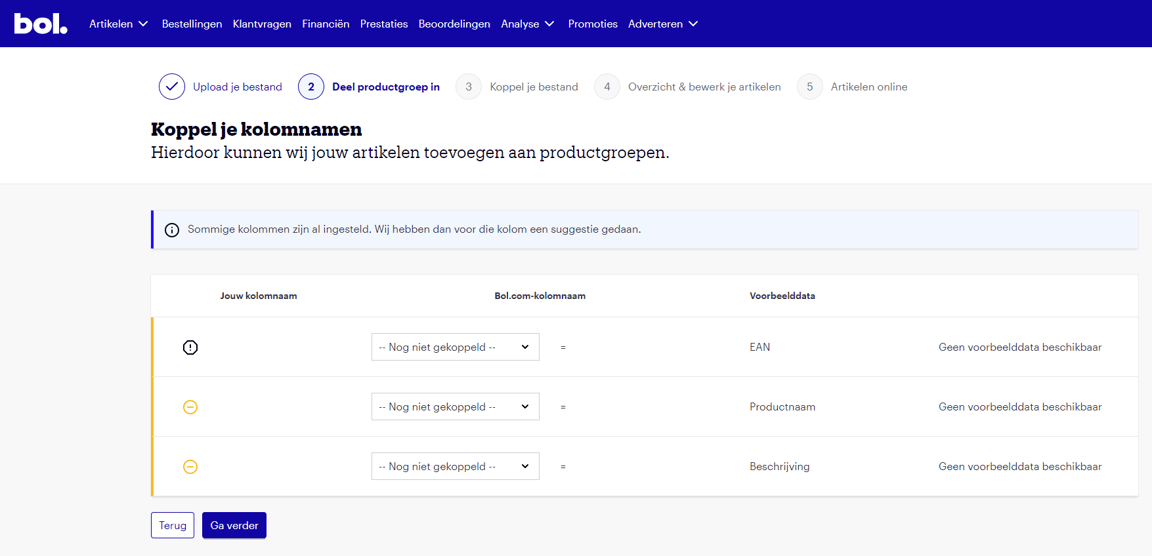
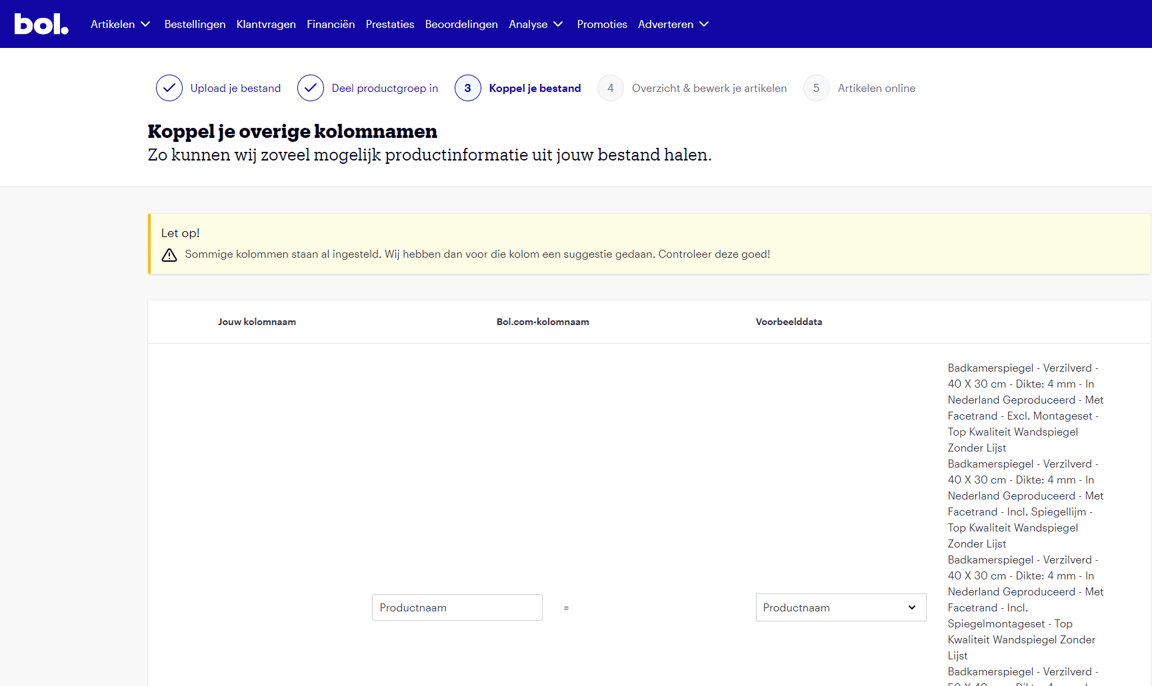
Link other information
The remaining information from the columns must now be linked to bol's attribute columns. The system provides suggestions for linking when the column names are the same or almost the same. An example of this is ‘colour’ and ‘kleur’. If the column name does not resemble the bol column name, the message ‘not yet linked’ will appear. You can then choose which column title matches bol's attribute column yourself. If a column name you have is not in bol's list, choose the ‘skip’ option at the bottom of the menu.
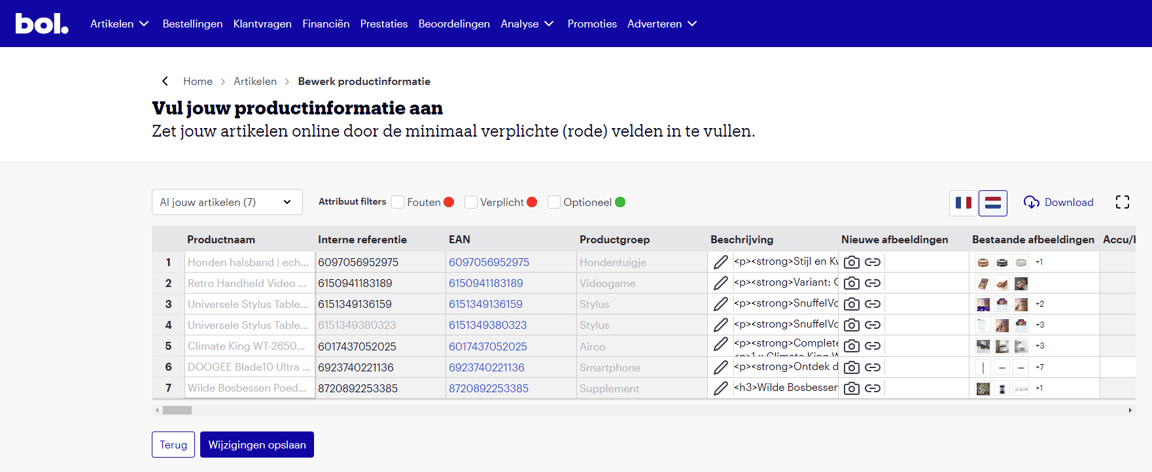
Completing the required content for multiple items at once
In the next step, you will see an overview of all the items you have uploaded. Different colors indicate which items require more content:
- All red fields are mandatory to fill in. These are the minimum required fields to get the item online.
- To optimally help customers in their purchasing process, it is important that you also fill in the green fields.
- Do you see a field with a red border? Then there is likely an incorrect value in this field. If you hover over the field with your mouse, a message will indicate what is wrong and what information is necessary.
Just like in Excel, you can drag values from one cell to multiple cells, so that information that is the same for different items can be filled in easily and quickly. Information is saved temporarily so you can switch between different categories without losing information. When you click ‘Save changes’, you will immediately receive feedback on how many items will now go online. It also indicates if any information is still missing.

If you don't want to add items to your seller account but prefer to use your own system, you can use Automate via bol. There are various ecosystem partners who can help automate your offers.
If you wish to build and manage the integration yourself, you can find an explanation on how to automate your offer here. Please note that this requires technical knowledge.
Please note!
Before you enter the items you want to sell via bol in the seller account, please check the following:
Are the items suitable to sell via bol?
Do you have an ISBN or EAN for each item?
Yes? Great, then you can get started!
Add items in bulk vs. Manage offer in Excel
You can add your offer in bulk to the seller account in 2 ways: via Add items in bulk (as discussed above) or via Manage offer in Excel. What is the difference between these two?
- Add items in bulk: The file you upload adds your items to your existing product range. If you already have 100 items online and you add another 100 items via ‘Add items in bulk’, you will then have 200 items online.
- Manage offer in Excel: The file you upload overwrites all existing product range: if you have 100 items online and you upload 100 items via ‘Manage offer in Excel’, then after the upload, only the 100 new items from your Excel upload will be online.
When to use which option?
- You use Add items in bulk to add new items (without overwriting your existing product range).
- You use Manage offer in Excel to adjust your current product range, such as changing the price, delivery promise, or stock, and/or to remove items by not including them in your file.
Add French content via ‘Add items in bulk’
Did you know that you can now also add or adjust French content yourself via ‘Add items in bulk’? It works a little differently, as follows:
- In your seller account, go to ‘Add items in bulk’.
- Upload your Excel file as usual and fill in everything in Dutch, including the title and description. This is necessary to create the item.
- Continue all steps in Dutch. So, link your Excel information to the correct columns and place the items in the correct Dutch product category.
- When you arrive at the ‘Complete your content’ screen, you have the option to click the French flag in the top right corner. You will then be taken to the page where you can add or adjust the French content.
- All done? Click ‘Save changes’. The adjusted content will be visible via bol within 8 hours. If this is not the case, it may be because priority has been given to existing or other new content, originating from other partners or brands.
It is also possible to add or adjust French information via the ‘My items’ overview. Curious how this works? Read the step-by-step plan here.
Good to know
Is there already French content available that you didn't fill in yourself? That's possible. We also regularly translate Dutch content if you have filled it in. This happens automatically. Of course, you can simply adjust the French content that is already present.
It's also possible that you don't see all item characteristics here. This is because some item characteristics are already automatically translated from Dutch. If the information is incorrect as a result, please adjust this item characteristic in Dutch, and it will automatically be applied in French as well.